
JPA LifeCycle Event로 서비스 로직에서 파일 관리 걱정 없애기
이번 글에서는 JPA LifeCycle Event를 활용해 파일 관리 로직을 별도의 관심사로 분리한 경험을 공유하려 합니다.
경험을 이야기하기 전에 먼저 JPA를 사용하시는 분들이라면 익숙할 Entity LifeCycle에 대해 간단히 짚고 넘어가겠습니다.
JPA Entity LifeCycle
JPA LifeCycle은 엔티티가 Persistence Context(영속성 컨텍스트) 안팎에서 어떤 상태를 가지는지를 설명합니다.
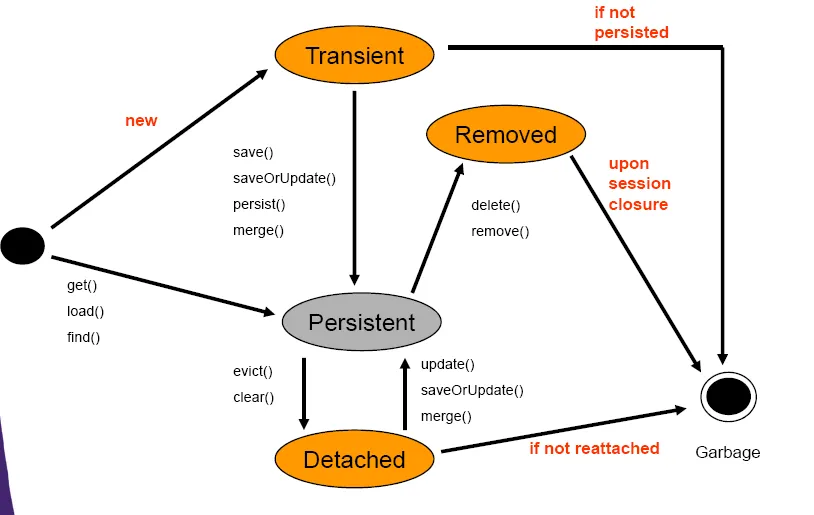
- Transient(비영속): 새로 생성된 엔티티. 아직 Persistence Context에 등록되지 않아 DB에 영향 없음.
- Persistent(영속): Persistence Context에서 관리되는 상태. 식별자를 가지며 DB에 존재할 수도 있고 아직 없을 수도 있음.
- Detached(준영속): 한때 영속 상태였으나 Persistence Context에서 분리된 상태. 더 이상 추적 대상 아님.
- Removed(삭제 예정): 영속 상태이지만 삭제 예약된 상태. flush 시 실제 DB에서 삭제됨.
EntityManager의 메서드를 통해 엔티티를 영속화하거나(detach, persist) 삭제 예약(remove) 상태로 변경할 수 있으며,
이러한 상태 변경 시점에 맞춰 LifeCycle Event를 수신할 수 있습니다.
JPA LifeCycle Event 종류와 시점
- PrePersist:
persist()호출 후, DB INSERT 실행 직전 호출 - PostPersist: DB INSERT 실행 직후 호출
- PreRemove:
remove()호출 후, DB DELETE 실행 직전 호출 - PostRemove: DB DELETE 실행 직후 호출
- PreUpdate: flush 과정에서 Dirty Checking으로 UPDATE 필요가 확정된 후, 실제 UPDATE 실행 직전 호출
- PostUpdate: DB UPDATE 실행 직후 호출
- PostLoad: 엔티티 로딩 직후 호출 (
find, JPQL,refresh, 2차 캐시 조회 포함)
PostLoad를 제외한 모든 이벤트는 flush 시점에 실행됩니다.
PostLoad는 Persistence Context에 엔티티가 로딩될 때 호출되며, 2차 캐시에서 조회될 때도 발생합니다.
이벤트 접근 방법
LifeCycle 이벤트는 크게 두 가지 방법으로 접근할 수 있습니다.
1. 엔티티 내부에서 어노테이션으로 직접 선언
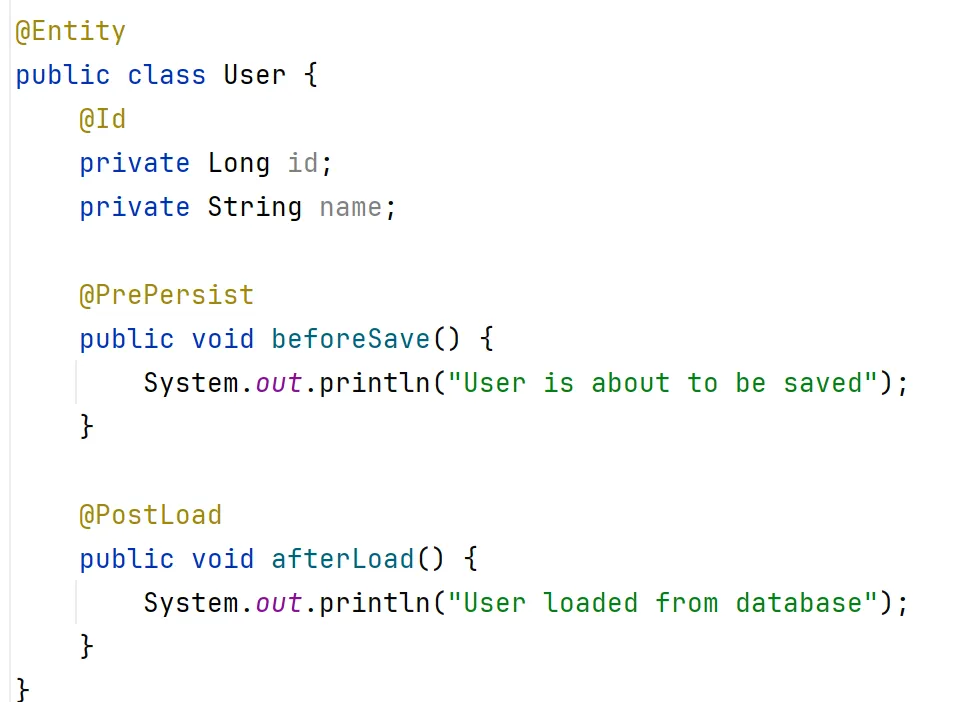
엔티티 내부에서 어노테이션을 사용해 이벤트를 가로채는 방식
2. 별도 Listener 클래스를 통해 처리
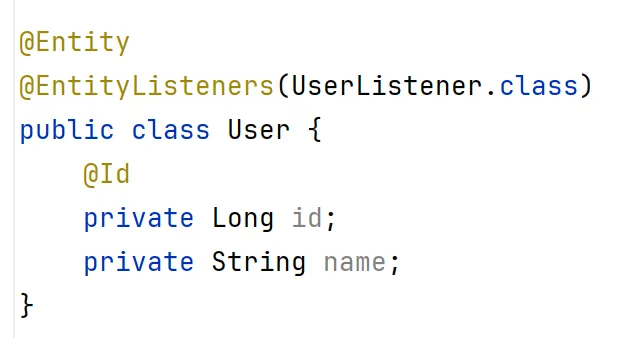
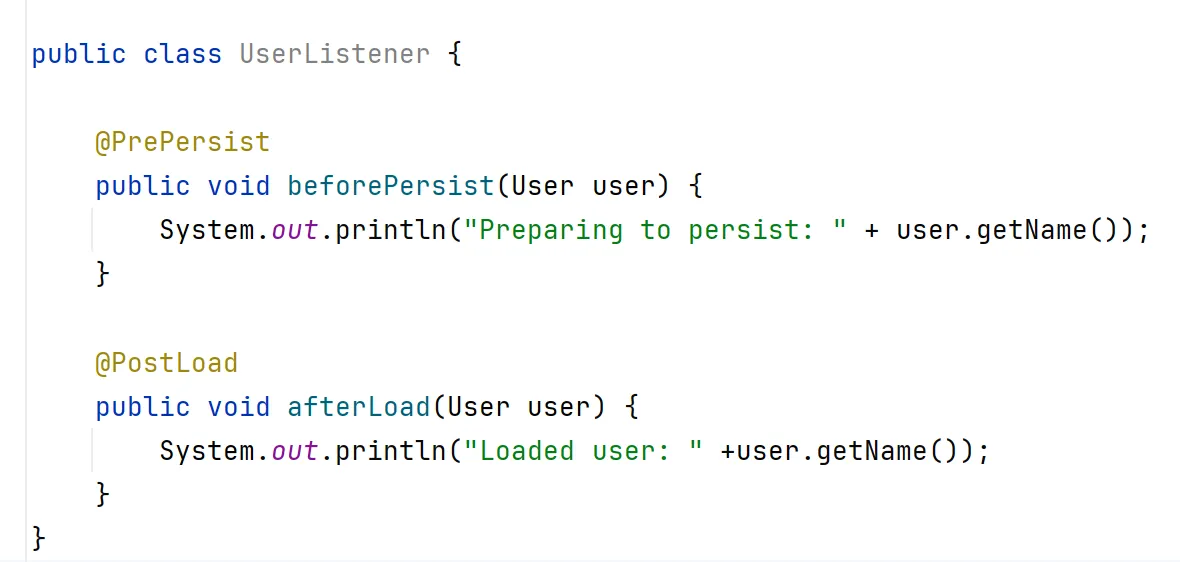
Listener 클래스를 두고 엔티티 이벤트를 가로채는 방식
활용
Entity LifeCycle Event Listener를 활용하면
엔티티 생명주기 변화 과정에 개입해 부가 로직을 자동으로 수행할 수 있습니다.
그렇다면 실무에서는 어떻게 적용할 수 있을까요?
저는 이를 파일 관리 로직을 별도의 관심사로 분리하기 위한 리팩토링 과정에서 활용했습니다.
설명
이미지 첨부 기능은 누구나 한 번쯤 구현해봤을 것입니다.
보통은 파일을 클라우드에 업로드하고, 업로드된 파일의 키 정보를 관리하며, 그 키를 통해 액세스하는 방식으로 처리합니다.
@Service
class ContentService(
    private val contentRepositry: ContentRepository,
    private val fileRepository: FileRepository
) {
    fun saveContent(content: ContentDto, file: MultiPartFile) {
        contentRepositry.save(content)
        fileRepository.uploadFile(file)
    }
}
예시 코드입니다.
uploadFile메서드 내부에는 클라우드 업로드 등의 구현이 들어갈 것입니다.
그런데 사용자가 기존 파일을 다른 파일로 교체하거나, 콘텐츠가 삭제되었을 때 연관된 파일은 어떻게 처리해야 할까요?
@Service
class ContentService(
    private val contentRepositry: ContentRepository,
    private val fileRepository: FileRepository
) {

    fun updateContent(content: ContentDto, file: MultiPartFile) {
        contentRepositry.update(content)
        fileRepository.removeFile(content.id)
        fileRepository.uploadFile(file)
    }

    fun removeContent(content: ContentDto) {
        contentRepositry.removeById(content.id)
        fileRepository.removeFile(content.fileId)
    }
}
일반적으로는 서비스 로직 안에 파일 업로드·삭제 로직을 직접 넣게 됩니다.
이 경우 콘텐츠 서비스뿐만 아니라, 파일을 사용하는 모든 서비스 로직에 파일 코드가 얽히게 되는 문제가 생깁니다.
비즈니스 로직이 복잡해질수록 파일 관련 코드와 강하게 결합되며,
결국 파일 기능을 수정할 때 영향받는 코드가 많아지는 구조가 됩니다.
저는 이러한 결합도를 낮추고, 매번 파일 리소스를 직접 신경 써야 하는 구조를 개선하기 위해
파일 관리 로직을 별도의 관심사로 분리하는 리팩토링을 진행했습니다.
구조
이를 해결하기 위해 파일 업로드 API를 별도로 분리했습니다.
즉, 파일을 먼저 업로드한 후 생성된 파일 식별자(fileId) 를 콘텐츠 업로드 시 전달받는 방식입니다.
class FileEntity {

    ...

    @Column(name = "is_used", nullable = false)
    var isUsed: Boolean = false

    ...
}
File Entity의 일부 내용입니다.
이때 FileEntity에는 isUsed라는 플래그를 두어 파일이 실제 사용 중인지 여부를 관리했습니다.
- 파일이 처음 업로드되면 기본값은
false - 콘텐츠가 업로드되면서 fileId가 참조되면
true로 변경
@Service
class ContentService(
    private val contentRepositry: ContentRepository
) {
    /*
     * 파일 정보는 content에 fileId로 담겨 있다.
     */
    fun saveContent(content: ContentDto) {
        contentRepositry.save(content)
    }
}
@Repository
class ContentRepositoryImpl(
    private jpaRepository: ContentJpaRepository,
    private fileRepository: FileJpaRepository
): ContentRepository {

    fun saveContent(content: ContentDto) {
        jpaRepository.save(
            ContentEntity().apply{
                ...
                file = fileRepository.findById(content.fileId).get()
            }
        )
    }
}
파일 사용 여부 갱신
class ContentEntity {
    ...
    @PostPersist
    fun persisted() {
        this.file?.isUsed = true
    }
    ...
}
isUsed 플래그는 콘텐츠 엔티티가 영속화될 때 갱신됩니다.
@PostPersist 이벤트를 활용해 콘텐츠가 저장되면 해당 파일의 isUsed 값을 true로 바꿔줍니다.
콘텐츠 삭제
@Service
class ContentService(
    private val contentRepositry: ContentRepository
) {

    fun removeContent(content: ContentDto) {
        contentRepositry.removeById(content.id)
    }
}
class ContentEntity {
    ...
    @PostRemove
    fun removed() {
        this.file?.isUsed = false
    }
    ...
}
콘텐츠 삭제 시에도 마찬가지로 @PostRemove 이벤트를 활용합니다.
컨텐츠 엔티티가 삭제(DELETE)가 완료되면 연관된 파일의 isUsed 값을 false로 변경해 파일이 더 이상 참조되지 않음을 표시합니다.
이렇게 하면 콘텐츠 서비스는 파일 처리 로직을 몰라도 되고,
온전히 콘텐츠 관련 로직만 다루면 됩니다.
실제 파일 정리
여기서 남는 문제는 “파일 상태만 바꿨을 뿐, 실제 파일 삭제는 언제?”인데, 이를 해결하기 위해 스케줄러를 두어 주기적으로 미사용 파일을 정리합니다.
class FileScheduler(
    private val fileRepository: FileRepository
) {
    @Scheduled(cron = "0 0 * * * *") // Runs every hour
    fun cleanupUnusedFiles() {
        fileRepository.cleanUpUnusedFiles(duration = Duration.ofMinutes(30))
    }
}
스케줄러는 일정 주기마다 실행되며,
업로드 후 일정 시간 동안 isUsed = false 상태로 남아 있는 파일을 찾아 실제 클라우드에서 삭제하고 DB 엔티티도 정리합니다.
추가로, 스케줄러는 스케일 아웃 환경(멀티 인스턴스)에서는 락(lock) 처리가 필요합니다.
그렇지 않으면 여러 인스턴스에서 동시에 실행되어 충돌이 발생할 수 있습니다.
class FileScheduler(
    private val fileRepository: FileRepository
) {
    @Scheduled(cron = "0 0 * * * *") // Runs every hour
    @SchedulerLock(name = "cleanupUnusedFiles", lockAtMostFor = "PT30S", lockAtLeastFor = "PT10S")
    fun cleanupUnusedFiles() {
        fileRepository.cleanUpUnusedFiles(duration = Duration.ofMinutes(30))
    }
}
dependencies {
    ...

    implementation("net.javacrumbs.shedlock:shedlock-spring:6.9.0")
	implementation("net.javacrumbs.shedlock:shedlock-provider-redis-spring:6.9.0")

    ...
}
위 코드는 예시이며, 저는 net.javacrumbs.shedlock:shedlock-spring 오픈소스를 사용했습니다.
@SchedulerLock 어노테이션을 활용해 단일 인스턴스에서만 스케줄러가 실행되도록 보장할 수 있습니다.
물론 Kubernetes 환경에서는 특정 Pod를 리더로 선출해 스케줄러를 실행하는 방법도 있지만, 간단하게 적용 가능한 방식으로 ShedLock을 선택했습니다.
참조: Using Leader Election with Spring Cloud Kubernetes and Spring Scheduler
마무리
이 구조 덕분에 파일을 참조하는 서비스들은 비즈니스 로직에서 파일 관리 코드를 신경 쓸 필요가 없어졌습니다.
엔티티 연관관계와 JPA LifeCycle 이벤트를 활용해 파일 상태를 자동으로 관리하고,
최종 삭제는 스케줄러에서 일괄 처리하는 방식으로 책임을 분리했습니다.
즉, 파일 관리 로직을 한 곳에서 집중 관리할 수 있게 된 것입니다.
작은 변화일 수 있지만, 관심사를 분리했다는 점에서 의미 있는 리팩토링이었다고 생각합니다.
긴 글 읽어주셔서 감사합니다 🙏